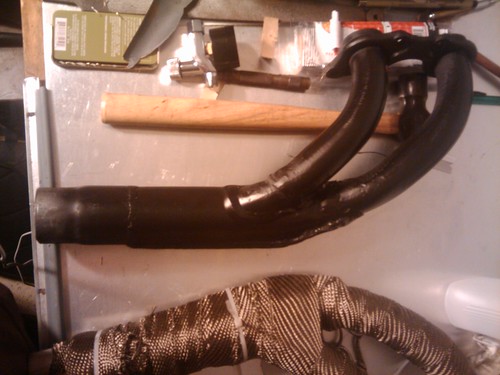
 Coming along, coming along.. These are just the headers, and fitting the titanium wrap. I'm not sure exactly what it's made of, but it's "titanium colored" material. I think they are actually fiberglass strands. These headers are made of mild steel. They will oxidize rapidly at high temperatures. So I don't know if wrapping them is a good idea, or just another manufacturer's gimmick which has caught on in performance tuning world. Certainly a refractory material INSIDE the headers sounds like a good idea, as it will protect the surface from the oxidizing atmosphere. I'm reluctant to spray ITC-100 down the header pipes though. I'm not running this in 24 hour endurance races. Yet.
Friday, July 30, 2010
GL1000 Headers
Coming along, coming along.. These are just the headers, and fitting the titanium wrap. I'm not sure exactly what it's made of, but it's "titanium colored" material. I think they are actually fiberglass strands. These headers are made of mild steel. They will oxidize rapidly at high temperatures. So I don't know if wrapping them is a good idea, or just another manufacturer's gimmick which has caught on in performance tuning world. Certainly a refractory material INSIDE the headers sounds like a good idea, as it will protect the surface from the oxidizing atmosphere. I'm reluctant to spray ITC-100 down the header pipes though. I'm not running this in 24 hour endurance races. Yet.
Monday, July 26, 2010
GL1000 Carb rebuild
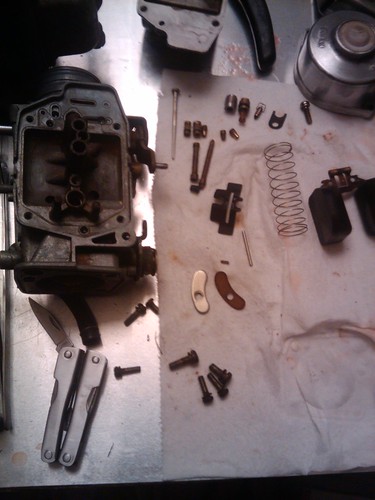
With debugging the wiring and ignition done, attention turns to getting the fuel in. The carburetors on this bike are pretty sophisticated. It costs $135 in gaskets and o-rings to rebuild the entire thing. It takes about 3-9 hours to do the whole thing right. There are a few people who do the rebuilds and will charge you anywhere from $200 to $800. The turn around time is anywhere from 4 weeks to 3 days. That's an option for some people, but anyone who claims to be an engineer should have no problem performing
this rocket surgery. So at the least, figure it costs about $150 and at least a whole day of work. This particular set wasn't completely filthy like some I've seen. Now that they are rebuilt, the engine fires right up and idles nicely.
Rebuild kits:
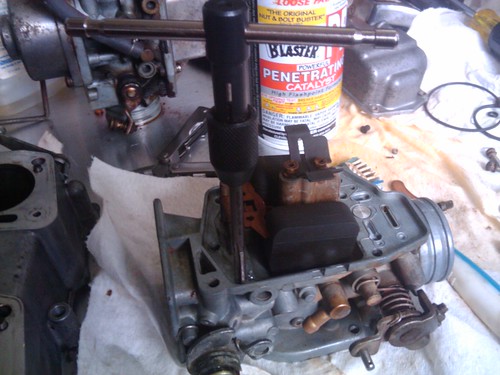
One of the float bowl screws had stripped the threads right out of the body, so I tapped it oversized and cut a new screw for it. Fortunately nothing else needed any machining or otherwise modifying. I could have drilled out the jets by a few thousandths to allow for extra airflow, but that isn't in the plans yet.
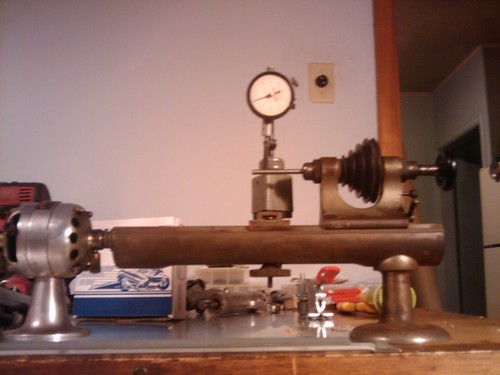
I found this micro lathe and have it kind of set up for drilling stuff. Its more of a novelty at the moment because the drive system is kind of scary and I'm not sure if the leather belt drive system is usable. The drive motor sounds like a jet engine spooling up, but fits in the palm of your hand. But it is the smallest useful lathe I've ever seen. For $40 at a garage sale, so beat that.
Tuesday, July 13, 2010
GL work & parts list
Hey, its still July! Heat and biting insects haven't slowed progress a bit.
Things that are done:
-Everything removed, cleaned.
-Tank drained, cleaned, refilled with clean gas and MMO.
-New fuel lines and filters put in. I didn't get any transparent lines. I like them so's that I can see that the fuel is going in the correct direction and isn't full of shite. But the fat black ones will have to do for now.
-Brakes off
-- Rear master cylinder is knackered; could be rebuilt, but why? More about that in a bit.
-- Front master cylinder works, but its just nasty. I want something in the 7/8 bore range that was made within the last decade. So this on will be replaced by a donor from a crashed Honda RC45 race bike with adjustable bits.
-- Lines are all off. They are to be replaced with custom teflon/stainless lines from Spiegler Performance Parts. They are great, good prices, fast service. They will cut and crimp up custom lines with any of their nice anodized fittings. The factory banjo bolts or new titanium ones will go back in.
-- Front calipers are in OK shape, but need boots and the grippy parts. These are off and cleaned. They will need painted or powder coated. I have 2 sets of front 4 and 6 piston calipers from other big sport bikes (crashed) but they won't go on without making adapters. Maybe later, if the single pots don't do the job.
-- Forks off, polished, then back on temporarily. I do not enjoy polishing, and I'll have to do it again, then clear coat tha bastards. Woo. Seals are weepy and look nasty down in there, so new OEM seals are going in. Upper tubes cleaned and polished with bronze wool. No scratches or pitting on them to ruin the new seals.
-- New battery and just going through all the wiring. Its mucked up pretty good, but most of the wires are connected to the things they need to be connected to.
-Ignition bits checked out. They are working as designed, but the spark looks a little weak.
-New condensers (capacitors)
-Electronic ignition from Dyna-S or something. I forget the details there, but I like modern electronic ignitions over mechanical ones. Points are a liability.
-- Starter was not working properly. At some point the nut which retains the starter bolt and all of the insulating bushings was loosened, which caused catastrophic arcing of the main coil lead against the rotating bits. It would turn over if I held the starter lead at the correct angle, jiggled it about a bit. It also smoked a few times, so I'd had enough of that. I pulled the starter motor out, pulled it entirely to pieces. The winding that goes around the permanent magnets (it has a name) was burned off of the bolt which goes through the housing/insulation bits on which you attach the battery's solenoid relay's hot line. So the bolt had to come out, be re-faced and re-soldered to the primary winding, then bolted back in correctly to preserve the insulating nylon bushings which prevent the whole thing from shorting out. This took maybe 20 minutes of sitting in the grass playing with something I'd never seen the inside of, kind of like a monkey getting ants out of a log. Anyhow, that worked out fine; I cleaned and greased the important bits and gears, fit it all back together somehow and put it back in the right hole. It had dumped about a liter of oil when it came out as its all lubricated by the engine oil on its mechanical side. Which I replaced with MMO temporarily until I change the oil, which will happen once it runs long enough to warm up the old sludge.
Eh what else. I had to tend to the seating arrangements, as there were none (see previous post). I found very nice CB750 seat from 1978 that had been preserved in all its vinyl goodness for around 80 USD + shipping. Yes, this stuff is expensive when found. I considered making a seat, but looked into the past, then into the future and realized what an awful job I'd done. So I went back to the present and found a good seat from a good old bike, which not surprisingly looks like it was made for this bike or one very much like it. While it fits perfectly from an aesthetic perspective, it requires some creative adapting to fit mechanically. So I fabricated the necessary bits after much looking at things from different angles. I got away with using one piece of scrap steel and a bit of angle iron. This also led to fitting a ZX14 rear tail+signal assembly by chance. Well you can do pretty much anything with steel, so that worked out fine.
Next is fuel pump check, then carbs need doing. That is a whole complete cluster of madness in itself.
Friday, July 2, 2010
78 GL1000 restore
About 3 weeks ago I found a mostly dead Honda Goldwing on the south side. It was all kitted out in peeled chrome, dry rotting saddle bags, ape hangers and other stuff that I could do without. So the brothers went down and rolled it into the back of Little Moe and drove it home. It's now in the back yard where its metamorphosing into a 600 lb 1-liter bull dog rat ton up endurance trailer queen street bruiser salt flat fuel burner super bike.
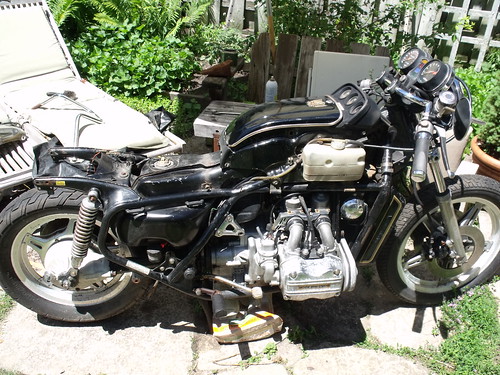 The nice thing about Goldwings is the engine. It's the most complicated engine you could want in a bike, but also probably the most durable and reliable. It's a 1-liter boxer engine, so the cylinder heads stick out either side. As most BMW folks will tell you, that makes it so much easier to to top end work! You can change head gaskets while sitting on the side of the road, etc etc. Well if it were air cooled that might be the case, but as is you'd be spilling coolant all over the highway.. anyhow. The cylinder heads (you get two!) are easily accessible to both the mechanic, the riders knees, and weather.
The last two bits are not so fantastic. The valve covers are naturally covered in chrome, because this is a big fat bike for fatties who like to have everything electroplated in nickel and chromium to give it that cheap, polished look. Because the real polished look takes time and work, rather than time and chemicals. Anyhow, due to the reactivity of aluminium alloys in relation to PH and the presence of other alloys, the nickel/chromium coating bubbles and peels and reveals the white hydroxide corrosion underneath.
Hydroxide corrosion itself is not so difficult to remove and prevent. But in the presence of electroplated nickel + chrome, or copper + chrome, it is a complete pain in the ass.
If you want to avoid wasting hours of your time, but want to restore the aluminum parts to some degree, pay someone else to do it. Otherwise you may peel, sand, brush, or try anything to remove both the old nickel/chrome and the hydroxide corrosion without making the old valve covers into a complete mess.
If you do get them polished up to a nice brushed aluminum finish, either stop there or have them powder coated. Do not try to paint them. This will end in tears. Paints of any kind are not durable enough for the kinds of things valve covers go through.
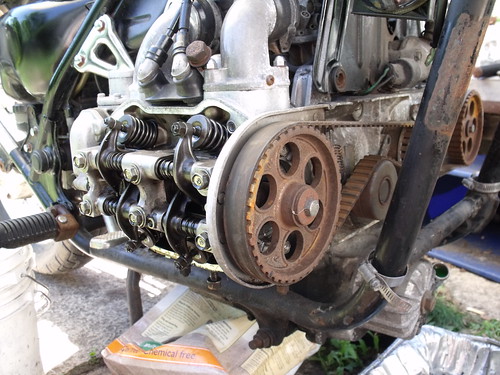
So, first things first, if the engine don't work right, whats the point? GL engines are interference type with belt driving timing gear. The belts on this bike had seen 54,000+ miles, which is probably 30,000 too many. Anyhow, belts are cheap and easy to change, so rather than risk complete engine disaster, I replace the belts.
The nice thing about Goldwings is the engine. It's the most complicated engine you could want in a bike, but also probably the most durable and reliable. It's a 1-liter boxer engine, so the cylinder heads stick out either side. As most BMW folks will tell you, that makes it so much easier to to top end work! You can change head gaskets while sitting on the side of the road, etc etc. Well if it were air cooled that might be the case, but as is you'd be spilling coolant all over the highway.. anyhow. The cylinder heads (you get two!) are easily accessible to both the mechanic, the riders knees, and weather.
The last two bits are not so fantastic. The valve covers are naturally covered in chrome, because this is a big fat bike for fatties who like to have everything electroplated in nickel and chromium to give it that cheap, polished look. Because the real polished look takes time and work, rather than time and chemicals. Anyhow, due to the reactivity of aluminium alloys in relation to PH and the presence of other alloys, the nickel/chromium coating bubbles and peels and reveals the white hydroxide corrosion underneath.
Hydroxide corrosion itself is not so difficult to remove and prevent. But in the presence of electroplated nickel + chrome, or copper + chrome, it is a complete pain in the ass.
If you want to avoid wasting hours of your time, but want to restore the aluminum parts to some degree, pay someone else to do it. Otherwise you may peel, sand, brush, or try anything to remove both the old nickel/chrome and the hydroxide corrosion without making the old valve covers into a complete mess.
If you do get them polished up to a nice brushed aluminum finish, either stop there or have them powder coated. Do not try to paint them. This will end in tears. Paints of any kind are not durable enough for the kinds of things valve covers go through.
So, first things first, if the engine don't work right, whats the point? GL engines are interference type with belt driving timing gear. The belts on this bike had seen 54,000+ miles, which is probably 30,000 too many. Anyhow, belts are cheap and easy to change, so rather than risk complete engine disaster, I replace the belts.
Subscribe to:
Posts (Atom)