Nothing special.
An e23 (733i) only 300k miles, sitting for 10 years. I'm partial to e23 slant noses.
This one is probably a nightmare. But Wilmette is so close, why not take a look?
http://chicago.craigslist.org/nch/cto/2488097506.html
Und ein e30:
http://chicago.craigslist.org/wcl/cto/2496340666.html
Far, but so cheap. Electrical gremlins.
Seriously though, I'm waiting for a 70s New Class roller. So's that I can drop a M30 engine in it.
Monday, July 18, 2011


Wednesday, July 13, 2011
Tank fab for GL1000
Tank build for GL1000. The tank's shape looks simple from the outside, but its actually pretty tricky underneath. The tank Honda designed sat below the seat between the rear wheel and transmission case. That puts the center of gravity lower and to the rear (when it's filled), and protects the tank in the event of a crash between the frame rails.
I've thrown all that good design out and built one to sit where it usually does, on top of the frame between the rider's knees! I wanted to move the battery into the space where the old tank lived, just in front of the rear wheel and centered. The old tank is rusty and will kill the carburetors.
 |
| As it stands |
I expected A FEW leaks after welding up, but it was leaking like a sieve. I didn't bother to count.
Flux core TIG welding is very dirty. There are lots of pin holes and potentials for voids. This also has a lot to do with welding technique and prepping the weld areas correctly, but..
 |
| Filler Neck welded in |
I'm grinding the welds down flat and laying another wider & hotter bead over them. So far this has filled any voids and killed leaks along the seams. I'm using pressurized air and soap to find pinholes, then grinding and laying a wide bead over the area. I don't think I could do such wide, flat beads with as much penetration if the first pass welds were not done. The top and bottom halves were shaped and tacked. Then the tacks were stitched together at the same heat, alternating sides to keep distortion low. All the tacks and stitches are hammered flat, then stress relieved. I did the tacking and stitching at the lowest heat with the wire feed a little higher than normal. Once all of the leaks are out and the pressure holds at 50PSI for a few hours, I'll etch the inside with a solution of phosphoric acid in water, dry it with MEK and use the liquid polymer liner to seal it. Then the outside will get smoothed/sanded and painted some color.
Tuesday, July 12, 2011
Lovely BMW 2002
I saw this excellently prepared BMW 2002 at a party over the 4th of July weekend. I didn't get any pictures of it then. Image courtesy of http://fuelfed.wordpress.com/ which is also excellent.


Wednesday, July 6, 2011
Craigslist temptations of the day

Has 292, 3spd probably on the tree.
"not running now did run when parked 8 or 9 years ago"
Or 12. Who's counting.
$800
More like ... $600? $700? OK $750
Bring a trailer.

75 F100 extended cab which is in much better condition than it should be. This truck is looooong. Extended cab/long bed makes it something like 18 feet. Good deal, nice color and remarkably intact for having lived in Chicago. Woo. Fuck.
$850
More like
Fuck thats a good deal.
Drive it home.

I don't get this one.
Selling it or fixing it or what?
too much money for having been so crawled over.
$1200
more like $400
Bring a trailer.

No real info on this one except it has:
"CLOTH INTERIOR"
"GOD WHEELS"
$2100
More like $800, but I guess with God wheels..
Thursday, June 16, 2011
Tuesday, June 14, 2011
Nibbles
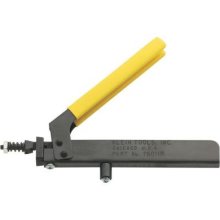
Klien Nibbler
This is the best tool I've found in a long time. It's a sheet metal nibbler. It's for nibbling sheet metal, rather than shearing. I have shears, I have nibblers. I have 2 air nibblers. They are for getting the job done fast. They can nibble in square feet per minute measurements. This Klien nibbler is perfectly designed. It requires very little effort to nibble through 20 gauge steel. It's not the quickest, shears are probably quicker, but it does very clean, precise cuts. You can drill a small hole and start right in the middle of a sheet (try that with shears), you can cut tight radius curves, and it wont raise an edge like a can opener the way a shear does.
I think this tool is made in Lincolnwood, IL just around the corner from me. The design is simple and perfect. The materials, coatings and finish are perfect. The heat treating of the blade is perfect. This tool is designed and made by experts, in America. The parts are all high quality, adjustable and replaceable or easily repaired.
Almost every time I go to the hardware store I see a deal on some Husky or other house brand tool which is too good to be true. $9 complete 1/4" socket set, $4.99 ratcheting screwdriver set, etc.
The products in this container may come from China, Malaysia, Indonesia, Taiwan, Mexico or the USA.
The quality of the house brand tool varies as widely as its origin. It is most likely to break, but it carries a hassle free lifetime replacement warranty. The cheaper manufactures believe that brand loyalty is easily gained by convenience, low price and replacing any defective product for free. Customer Service!
Everyone replaces broken tools for free nowadays. The material cost of a tool or part is low compared to customer satisfaction. I find broken 10mm sockets all over the garage. I break 10mm sockets more than anything else. All of the broken ones are house brand X, none of them are American made SnapOn, MAC, MTF, SK or Klien tools. Broken tools waste time, which is worth more than money. I think.
The saved time and satisfaction of using a well made tool are worth the extra money, as is knowing that Your Country (America) still makes the best tools available in your country.German tools are great, but we all know that it was the American industrialists who helped them out after WW1 that made them that way.
Monday, June 13, 2011
Adore
My entry did not win the GRM/FFR design contest. I congratulate the winners. I liked some of the designs and renders very much.
SO, since I didn't win, here is a picture of Audrey Hepburn.

Friday, June 3, 2011
More rendered views
The door seams are missing. I haven't figured out a clean way to do that with Wings3D, and it should have been done before smoothing


Friday, May 13, 2011
More Render

I added the NACA duct to feed the cockpit. The airflow from the radiator is directed up via the larger vent behind it which follows the contour of the glass. The carbon front splitter is new. It will need some adjustable support rods as it provides most of the front end down-force. There is a rear wing modeled, but I didn't include it here.
Monday, May 9, 2011
M110 Vacuum diagram

Oh OK, have at them.


It appears the front side vent just vents into the rear side vent intake. This is just an illusion. The rear vent actually takes clean air from.. magic.
turbo for cheap?
Remember: you get what you pay for. Here's a new turbo kit for $169. A good new Garrett/Honeywell turbo would be about $1200 or more. You could find a rebuilt or used one for around $500.
I did run into a test run by an engine builder's magazine where they strapped an inexpensive EBay turbo to a GM 355 V8 which had 150k miles on it. They dialed it up to around 800bhp with 8psi or so of boost. So, if plumbed in properly the cheap turbos do function, but they were not tested for durability. Repeated heating and cooling expands and contracts the cast iron exhaust impeller housing. It has to be very good cast iron, something that can withstand extreme heat ranges and pressures without cracking or exploding outright. The aluminum intake compressor will also expand and contract, but at different rates than the impeller housing. It has to withstand the high internal pressures of a compressor without blowing up. When these expand, the housing to turbine blade clearance shrinks, potentially causing the blades to contact the housing. This is unlikely, but in cheaper turbines where tolerances are guessed at, the gap must be overcompensated for. So, they can either be less efficient, or more prone to blowing themselves to pieces. Another consideration is the quality and tolerance of the floating bearing. The center rotating hub must float on a high pressure, externally cooled oil supply. This is almost always supplied by the engine's lubrication system, so it must be plumbed in and out of the existing oil loop. The quality and spec of the oil and the tolerances withing the bearing and center rotating hub are critical. As the steel shaft heats up, it closes the gap to the bearing. This clearance must also be accounted for at a range of temperatures. Some of the turbo kits just use a t-splice to take pressurized oil from the oil pressure sending unit line. I'm not sure if that's a good solution, as the flow is pretty restricted in such a small line. I wouldn't throw one of these turbos on an engine without adding an external oil cooler to prevent cooking off the engine oil. I would probably plumb the turbo directly into the cooling unit circuit. Most after-market oil coolers use an adapter plate at the oil filter connection to send off oil to a heat exchanger. This is not a bad idea in general, and requires no significant engine modification or machining. Expect engine oil to break down much quicker when run through a turbine. Water cooled turbines are much more expensive.
So, the turbo itself may look cheap, but to make it work properly you need the following:
-turbine: $170
-oil plumbing: $100
-oil cooler and plumbing: $150
-intercooler: $100
-intercooler and air intake plumbing: $150
So now we are at $670. That's still cheaper than one Garrett turbine without all of the plumbing. However, there are more problems which must be accounted for. What happens when you add a whole lot more air to an engine which wasn't designed for a lot of boost? The fuel/air mixture is now very lean. Lean mixtures are bad news. As you run a lean engine up the rpm range, things start to get really hot. There isn't enough cold, high octane gas to cool the cylinder down. Fuel starts detonating before the piston reaches its apex. This is where engines burn up valves, blow holes in pistons and in the worst case throw rods through the block. The maximum fuel pressure and injector capacity isn't enough for the additional air; it can't keep the air/fuel mixture rich enough. A rich mixture prevents detonation to some degree, as does high octane fuel or possibly adding an ethanol mix. Some engines will run fine at lower RPMs, but as the turbine spools up and the engine starts breathing a whole lot more, the injectors run out of capacity. The easiest solution is to run higher capacity injectors and add a high pressure/high flow fuel pump. Electronically controlled engines with detonation sensors, MAF, O2, and EGT sensors can alter ignition timing and fuel mixture to get optimum fuel burn without detonation. Older engines without a feedback loop may use air flow to regulate fuel flow similar to a carburetor, but using a pressure regulator rather than the Venturi effect/float system. So the fuel system must be altered to either run richer overall, and not lean out at the higher RPMs, or run a mixture regulator manually which can be adjusted manually. So, considering the fuel system alterations, the cost will be well over $1200, which is still reasonable for turning a boring 180bhp into 400 or so clutch smoking horses.
And then back to the original reason for this post, will the EBay compressor hold up for a reasonable amount of time, or will you be left with a cheap dead snail.
Friday, May 6, 2011
Interior gauges, switches, controls

Adding more details. I don't like modern molded vinyl dashes. The best dashes are simply a sheet of aluminum with cut-outs for gauges and switches. I will add labels to the banks of switches and buttons.
-battery toggle
-pre-lube motor run
-ignition toggle
-starter motor run
-electric water pump toggle
-fuel pump, reserve pump
-head, tail lights etc.
-rotary mixture
-boost/wastegate control
-fire suppresion
The controls should be on the center console within the driver's reach, not so much on the dashboard.
Wednesday, April 27, 2011
Free CryEngine3 SDK coming this summer
FTA:
“This will be a complete version of our engine, including C++ code access, our content exporters (including our LiveCreate real-time pipeline), shader code, game sample code from Crysis 2, script samples, new improved Flowgraph and a whole host of great asset examples, which will allow teams to build complete games from scratch for PC.”
The SDK and editing tools are incredible. When software is this good, it's hard not to share it.
Monday, April 25, 2011
Yesterday's design
Still not very distinctive. Air ducts, lights, large canopy all kind of 60's LeMans inspired.


Still messing with lights, but they take a long time to render and even longer to make realistic.


F100s at auction
Mind you this truck is almost new, even though it was built in 1976. 1200 miles on the clock.

Monday, April 11, 2011
Engine fitting
I'd like to have a general idea of how the EJ-20 engine will fit in the chassis, and how the body will fit on that. I don't have any accurate engine models, so I'll have to create them. Looking at a photo of the engine sitting on a pallet gives a very bad approximation of dimensions, but its what's available. The engine in the renderings below is WAY bigger than the EJ20 or EZ3x engine. I created these mostly to have some fun with the exhaust routing. I have created a more accurately sized EJ-20 4 cylinder with the AWD transaxle in proper proportions, but it's not rendered. The actual frame should be similar to the FFR GTM super car's chassis, but shorter in length. I can't imagine they'd build it much different, because the GTM is a fantastic looking chassis. For the purpose of fitting everything, I'll render the body in a thin glass material. I found that the model below provides no room for driver + passenger, but prefers a more central driving position. That will have to be remedied somehow. I'm guessing from the current entries on the GRM forums (I'm trying to avoid those) that the below style is pretty far off from the rest of the contestants. What I'm seeing there is closer to a Lotus Evora than a 60's LeMans racer.


Wednesday, April 6, 2011


more concepts


Why not? Inspired by the 1960s LeMans racing cars by Ferrari and the Alfa Romeo Stradale. It's probably way too long and low for the proposed frame and driving position, but who cares really...
And who designs the frame first??
Subscribe to:
Posts (Atom)